Cherry Yogurt Popsicles by Chef Susan Ytterberg
Summer is funner with these!
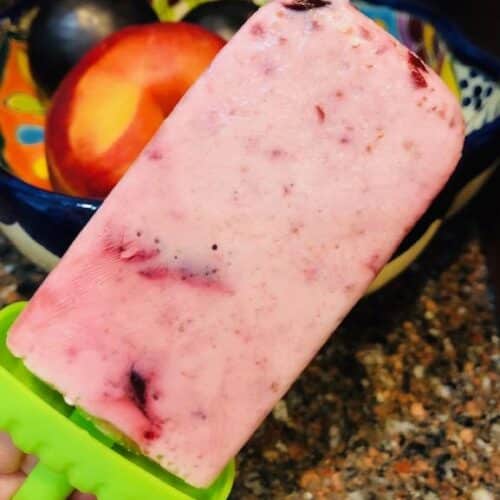
I know funner is not really a word, but how do you describe these creamy, pretty, cherry, pink popsicles? Have you ever made popsicles before? Want to know how and even better- how darn easy it is? If you’re an ice cream addict, these may cure you of your habit. Not only are these tasty and sweet, they are also much lower in calories and fat thanks to using Stevia instead of sugar- and yogurt instead of heavy cream!
I purchased the popsicle molds on Amazon- very inexpensive and the great thing is, you won’t even need a napkin. Not that these really, “drip”, but if they did, the handle has a built in well to catch any drip that may sneak by you. Love them! The pop molds are easy to use, easy to clean and easy to store in your freezer with a stand for the pops to sit on. My recipes is a take-off on many you can find online

Cherry Yogurt Popsicles
Equipment
- 1 Groovy Pop Molds- purchase on Amazon
- 1 box 6 to a box & stand included
- 1 Blender or Vitamix
Ingredients
- 1 cup non-fat yogurt
- 4 packs Truvia or stevia
- 1/3 cup milk
- 1 cup frozen Cherries semi thawed
- 24 thawed cherries cut in quarters or halves for the molds
- Cherry juice- drain juice from bag of frozen cherries into a bowl
- 1 1 banana, ripe & peeled
Instructions
- Assemble your 6 empty molds and insert securely into stand. Set aside pop-tops until end
- Drop 1 or 2 cherry pieces into bottom of each mold
- Spoon a teaspoon of cherry juice into each mold
- In a blender, blend together the yogurt, banana, Truvia, milk and semi frozen cherries
- Pour the blended cherry mixture into each mold until 1/2 full
- Then layer the cut cherries into each mold and evenly distribute any remaining cherry juice into each mold
- Pour the blended cherry mixture into mold to about 1/4" from the top. Then drop a few more cherry pieces onto top and then add a thin layer on top of the cherry mixture. VIOLA! The molds are now filled!
- Next insert the pop top into each mold and firmly snap the lid closed. You are DONE! Place stand with the 6 pop molds in your freezer and in 3 to 4 hours they will be frozen and ready to enjoy.
- To enjoy, remove the pop from stand, run under water. Then firmly, pull the pop top off by the handle and your popsicle will slide out ready to enjoy.
- One LAST thing! There will be some cherry blend left over in your blender so you should pour that in a cup and drink it! If it's a little thick, blend in more milk or filtered water if you prefer. You now have a delicious smoothie!


